用Hexo套现成的主题做出的静态网页快是快,但是没什么意思。所以..本篇是博主桃的小站进阶学习记录~ ҉٩(´︶`)۶҉!! 之处理POST表单数据。
先前我们已经用Github+Webhook+Nginx实现网站自动化部署了,详情可参见网址。
uwsgi的安装很简单:pip3 install uwsgi,就不详细说了。
form表单和post请求
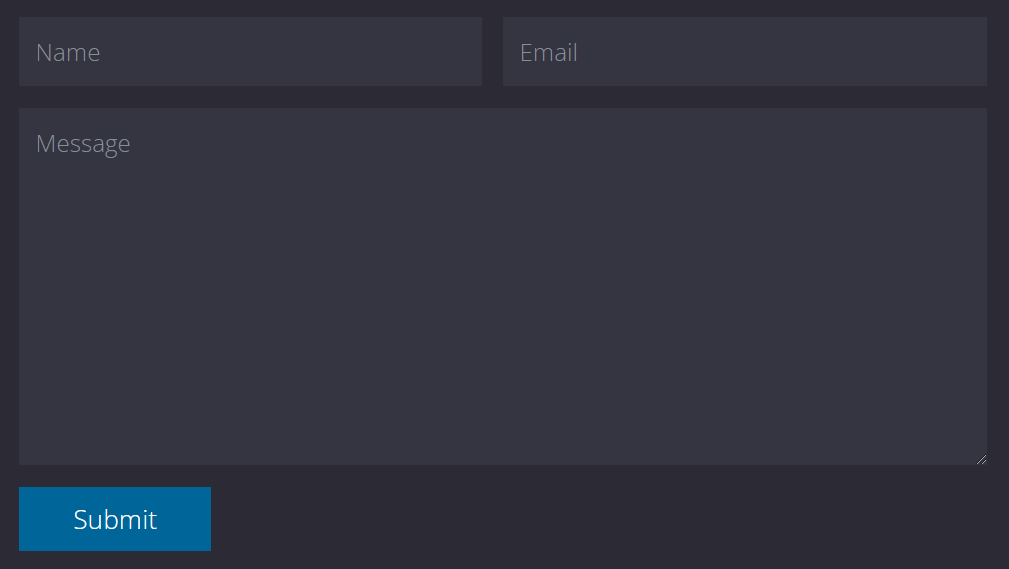
想要有POST请求,首先要有一个包含form表单的html文件,比如:
<form action="http://test.com/contact" method="post" class="contact-form">
    <div class="row">
        <div class="form-group col-md-6 col-lg-6 col-xl-6">
            <input type="text" id="contact_name" name="contact_name" class="form-control" placeholder="Name"  required/>
        </div>
        <div class="form-group col-md-6 col-lg-6 col-xl-6 tm-col-email">
            <input type="email" id="contact_email" name="contact_email" class="form-control" placeholder="Email"  required/>
        </div>
    </div>
    <div class="form-group">
        <textarea id="contact_message" name="contact_message" class="form-control" rows="9" placeholder="Message" required></textarea>
    </div>
    <button type="submit" class="btn btn-primary tm-btn-submit">Submit</button>
</form>
看起来大概是这个样子:

这里我们的method="post",表示服务器收到的会是一个POST请求而不是GET请求。原生的form表单,enctype的值没有指定的话,传输的数据就是最常见的默认的application/x-www-form-urlencoded格式,大概长这样:
contact_name=%E6%A1%83%E5%AD%90&contact_email=peachrl%40aliyun.com&contact_message=2021-11-19+14%3A02+%E6%B5%8B%E8%AF%95一共传输了3组键值对。
nginx+uwsgi反向代理接收数据
我们将数据发送到了网址 http://test.com/contact ,服务器端由nginx使用uwsgi_pass代理,nginx的配置文件:
server {
        listen 80;
        server_name test.com;
        location / {
                index index.html;
                root /home/lighthouse/test;
        }

        location /webhook {
                proxy_pass http://127.0.0.1:1234;
        }

        location /contact {
                uwsgi_pass 127.0.0.1:5678; # 使用uwsgi_pass代理
                include uwsgi_params;
                uwsgi_param SCRIPT_NAME /contact;
        }
}
nginx会将收到的所有请求都转发到”127.0.0.1:5678″端口上,即uWSGI服务器上。
这里SCRIPT_NAME是用来区分应用的。一个nginx中可以同时运行多个应用,如果想通过不同的路径来路由不同的应用,比如通过 http://localhost/contact 来访问我们这里所需要的应用,则要在nginx的配置文件中加入 uwsgi_param SCRIPT_NAME /contact;。
另外uwsgi配置文件uwsgi.ini:
[uwsgi]
socket = 127.0.0.1:5678
env LANG=zh_CN.UTF-8
env LANGUAGE=zh_CN.UTF-8
env LC_CTYPE=zh_CN.utf-8
env LC_ALL=zh_CN.UTF-8
env PYTHONIOENCODING=utf-8
mount = /contact=/home/lighthouse/uwsgi/contact.py
manage-script-name = true
master = true
processes = 4
threads = 2
stats = /home/lighthouse/uwsgi/uwsgi.status
pidfile = /home/lighthouse/uwsgi/uwsgi.pid
socket-timeout = 10
post-buffering = 65535
buffer-size = 65535
max-requests = 6000
harakiri = 300
; daemonize = /home/lighthouse/uwsgi/uwsgi.log ; 如果出错可以查看log文件,需要取消这行注释才会有log文件
; uwsgi --ini /home/lighthouse/uwsgi/uwsgi.ini ; 启动
; uwsgi --reload /home/lighthouse/uwsgi/uwsgi.pid ; 重启uWSGI服务器由命令uwsgi --ini /home/lighthouse/uwsgi/uwsgi.ini启动,会进行socket端口监听,也就是上面文件第一行。mount和manage-script-name两行则将/contact地址指向我们的应用路径,并启用之前在nginx里配置的”SCRIPT_NAME”参数。
python3处理数据
前面将 http://127.0.0.1/contact 指向了/home/lighthouse/uwsgi/contact.py这个应用。在contact.py中使用了python3的urllib库进行数据处理。
这里强烈推荐参考【Parsing the Request - Post】这篇文章,很有启发。关键就是:
request_body_size = int(environ.get('CONTENT_LENGTH', 0))
request_body = environ['wsgi.input'].read(request_body_size)python3从CONTENT_LENGTH流中读取wsgi.input。
踩坑
按道理,使用python3不应该再有编码问题,可是我偏偏就遇到了。如果输入英文就没有问题,输入中文就502 Gateaway。
在uwsgi的配置文件中添加daemonize = /home/lighthouse/uwsgi/uwsgi.log,查看后得知以下报错:
UnicodeEncodeError: ‘ascii’ codec can’t encode characters in position 0-1: ordinal not in range(128)在翻遍全网后终于搞清楚,parse_rs不支持中英文混合的字符串,需要先转换一下:
from urllib.parse import parse_qs
from urllib.parse import quote
import string

request_body = environ['wsgi.input'].read(request_body_size)
request_body = quote(request_body,safe=string.printable)
d = parse_qs(request_body)

contact_name = d.get('contact_name', [''])[0]
contact_email = d.get('contact_email', [''])[0]
contact_message = d.get('contact_message', [''])[0] 这里直接从wsgi.input得到的是bytes类型的ASCII编码的数据。通过quote可以转化为'utf-8',其中safe参数表示可以忽略的字符,这里引入了string库,string.printable表示ASCII码第33~126号可打印字符,其中第48~57号为0~9十个阿拉伯数字;65~90号为26个大写英文字母,97~122号为26个小写英文字母,其余的是一些标点符号、运算符号等。之后由parse_qs得到的是个dict,每个值都是个list,再从中取出contact_name,contact_email,contact_message三个值即可。
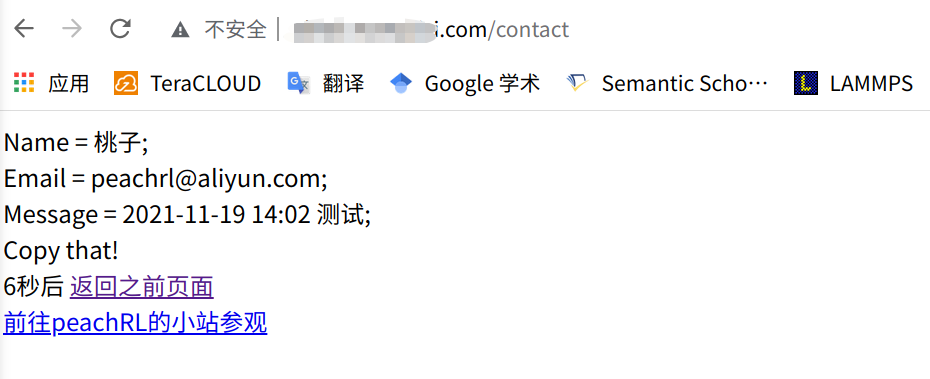
完整contact.py如下,所实现的操作是将post数据解析出来在log文件里存一份,并由html输出:
from urllib.parse import parse_qs
from urllib.parse import quote
import string
import time

html = """
<html>
<body>
    <p>
        Name = %s; <br>
        Email = %s; <br>
        Message = %s; <br>
        Copy that! <br>
        <script type="text/javascript">
            var t = 7;//设定跳转的时间
            setInterval("refer()", 1000); //启动1秒定时
            function refer() {
                if (t == 0){
                    location = "http://test.com"; //跳转的地址
                }
                document.getElementById('show').innerHTML = "" + t + "秒后"; // 显示倒计时
                t--; // 计数器递减
            }
        </script>
        <span id="show"></span>
        <a href = "http://test.com">返回之前页面</a>
    </p>
</body>
</html>
"""

def application(environ, start_response):
    # the environment variable CONTENT_LENGTH may be empty or missing
    try:
        request_body_size = int(environ.get('CONTENT_LENGTH', 0))
    except (ValueError):
        request_body_size = 0

    ticks = str(time.time())
    log_file = open("/home/lighthouse/uwsgi/log."+ticks, 'w')
    # When the method is POST the query string will be sent
    # in the HTTP request body which is passed by the WSGI server
    # in the file like wsgi.input environment variable.
    request_body = environ['wsgi.input'].read(request_body_size)
    request_body = quote(request_body,safe=string.printable)
    d = parse_qs(request_body)

    contact_name = d.get('contact_name', [''])[0]
    contact_email = d.get('contact_email', [''])[0]
    contact_message = d.get('contact_message', [''])[0]

    print("wsgi.input %s" %environ['wsgi.input'], file=log_file)
    print("request_body_size %s" %environ.get('CONTENT_LENGTH', 0), file=log_file)
    print("request_body %s" %request_body, file=log_file)
    print("Name=%s\nEmail=%s\nMessage=%s" %(contact_name,contact_email,contact_message), file=log_file)
    log_file.close()

    response_body = html % (contact_name or 'Empty', contact_email or 'Empty', contact_message or 'Empty')
    response_body = response_body.encode("utf-8")

    status = '200 OK'

    response_headers = [('Content-Type', 'text/html; charset=utf-8'), ('Content-Length', str(len(response_body)))]

    # 将响应码/消息及响应头通过传入的start_reponse回调函数返回给server
    start_response(status, response_headers)

    return [response_body]
最终效果:

需要注意,uwsgi的配置文件以及py脚本,任何修改都需要重启uwsgi。当然,nginx配置文件修改也需要重启nginx。

