桃子的小站已经从Github Pages服务转移到了腾讯的云服务器上。这样就有了两个新问题:一是,再像以往直接用hexo d -g,能够将生成的静态网页推送到github上,但并不能直接放到云服务器上;二,云服务器上的静态网页怎么能够通过域名访问到?本文就来解决这两个问题。
【问题二】nginx部署静态网页
先回答问题二。
Nginx (engine x) 是一款轻量级的 Web 服务器 、反向代理服务器及电子邮件(IMAP/POP3)代理服务器。
简单安装:sudo apt-get install nginx
查看版本(查看是否装好了):nginx -v
nginx的配置文件在目录/etc/nginx/nginx.conf,但是我们尽量不修改这个。
- nginx.conf
这个是 nginx 的主配置文件,里面包含了当前目录的所有配置文件,只不过有的是注释状态,需要的时候自行开启 (后面几个常用的)
- conf.d
这是一个目录,里面可以写我们自己自定义的配置文件,文件结尾一
定是 .conf 才可以生效 (当然也可以通过修改 nginx.conf 来取消这个限制)
- sites-enabled
这里面的配置文件其实就是 sites-available 里面的配置文件的软连接,但是由于 nginx.conf 默认包含的是这个文件夹,所以我们在
sites-available 里面建立了新的站点之后,还要建立个软连接到 sites-enabled 里面才行
- sites-available
这里是我们的虚拟主机的目录,我们在在这里面可以创建多个虚拟主机
我们可以在/etc/ngix/sites-available文件夹里建立一个新的配置文件web,并建立个软连接使新站点生效:
ln -s /etc/ngix/sites-available/web /etc/nginx/sites-enabled/webnginx的配置和修改都放在这个web里,具体语法参考nginx.conf里面的http大括号里面的server字段:
server {
        listen 80; #http
        server_name test.com;

        location / {
                index index.html;
                root /home/lighthouse/test;
        }
}
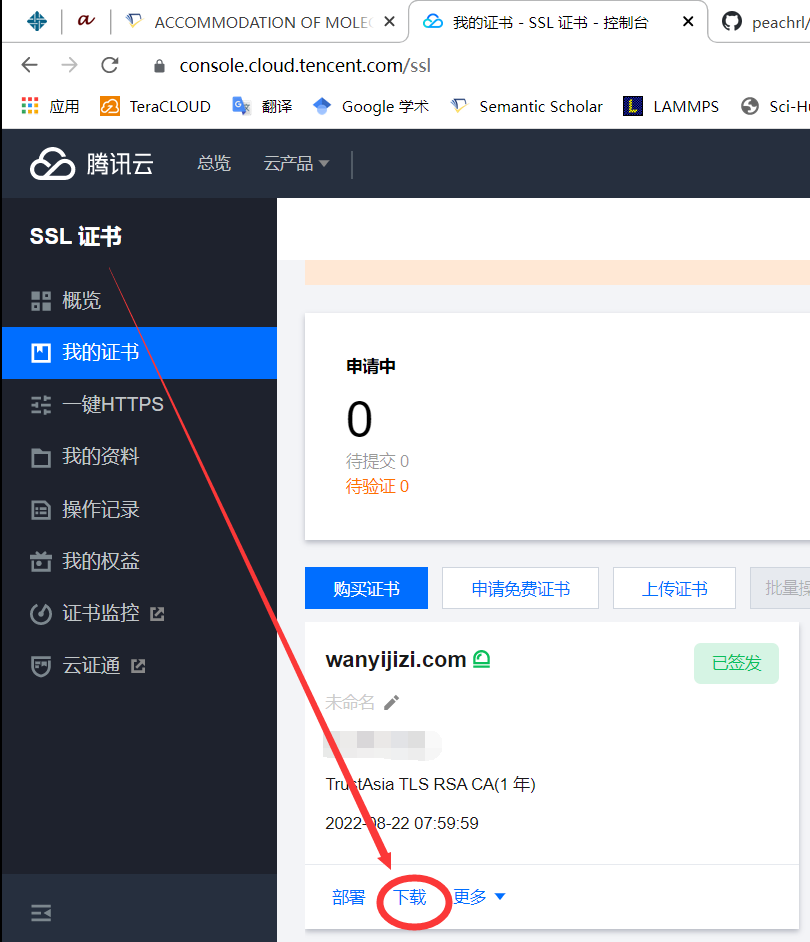
如果要支持https的话则还需要配置ssl证书,证书在哪里申请的就在哪里下载。比如我的证书都是在腾讯申请的:

把证书下载并放在服务器上,这时web应该配置为:
server {
        listen 443 ssl;  #https

        server_name test.com;

        location / {
            index index.html;
            root /home/lighthouse/test;
        }

        ssl_certificate /etc/nginx/certs/1_test.com_bundle.crt;
        ssl_certificate_key /etc/nginx/certs/2_test.com.key;
}
【问题一】webhook自动同步github仓库的静态资源
通过nodejs和nginx创建webhook服务后端
安装必需的组件:
sudo apt install nodejs
node --version
sudo apt install npm
npm --version
npm i -S github-webhook-handler
npm i -g pm2
后端代码保存在webhook.js文件中:
var http = require('http')

var createHandler = require('github-webhook-handler')

var handler = createHandler({ path: '/webhook', secret: '(设个密码)' })


function run_cmd(cmd, args, callback) {

      var spawn = require('child_process').spawn;  var child = spawn(cmd, args);

      var resp = '';
      child.stdout.on('data', function(buffer) { resp += buffer.toString(); });

      child.stdout.on('end', function() { callback (resp) });

}
 http.createServer(function (req, res) {

       handler(req, res, function (err) {

               res.statusCode = 404

               res.end('no such location')

             })

 }).listen(1234)

handler.on('error', function (err) {

      console.error('Error:', err.message)

})

handler.on('push', function (event) {

      var name=event.payload.repository.name;

      console.log('Received a push event for %s to %s',    event.payload.repository.name,    event.payload.ref);


      if (event.payload.ref === 'refs/heads/main') {
               run_cmd('sh', ['./auto_build.sh',name], function(text){ console.log(text) });

            }

})

handler.on('issues', function (event) {

      console.log('Received an issue event for % action=%s: #%d %s',    event.payload.repository.name,    event.payload.action,    event.payload.issue.number,    event.payload.issue.title)
})
这段代码的意思是,监听服务器本地的1234端口,每当收到来自github推送来的数据,符合 "ref": "refs/heads/main" 的push事件,就运行auto_build.sh脚本。
这里auto_build.sh是git拉取仓库文件到对应文件夹的命令:
#!/bin/bash

WEB_PATH='/home/lighthouse/test'
WEB_USER='lighthouse'
WEB_USERGROUP='lighthouse'

echo "Start deployment"
cd $WEB_PATH
echo "pulling source code..."
git reset --hard origin/main
git clean -f
git pull
git checkout main
echo "changing permissions..."
sudo chown -R $WEB_USER:$WEB_USERGROUP $WEB_PATH
echo "Finished."在auto_build.sh起作用前要先建立/home/lighthouse/test文件夹,在这个test文件夹进行首次克隆git clone git@github.com:peachrl/peachrl.github.io.git .。
现在,各文件都准备好了,还需要让webhook.js文件在后台保持运行和监听端口:
pm2 start webhook.jswebhook.js监听的是来自 http://127.0.0.1:1234/webhook 的数据,还需要设置一下nginx,让nginx把从 http://test.com:1234/webhook 收到的数据反向代理到服务器本地的1234端口。更改web配置文件:
server {
        listen 80;
        server_name test.com;
        location / {
                index index.html;
                root /home/lighthouse/test;
        }

        location /webhook {
                proxy_pass http://127.0.0.1:1234;
        }
}
在github配置webhook

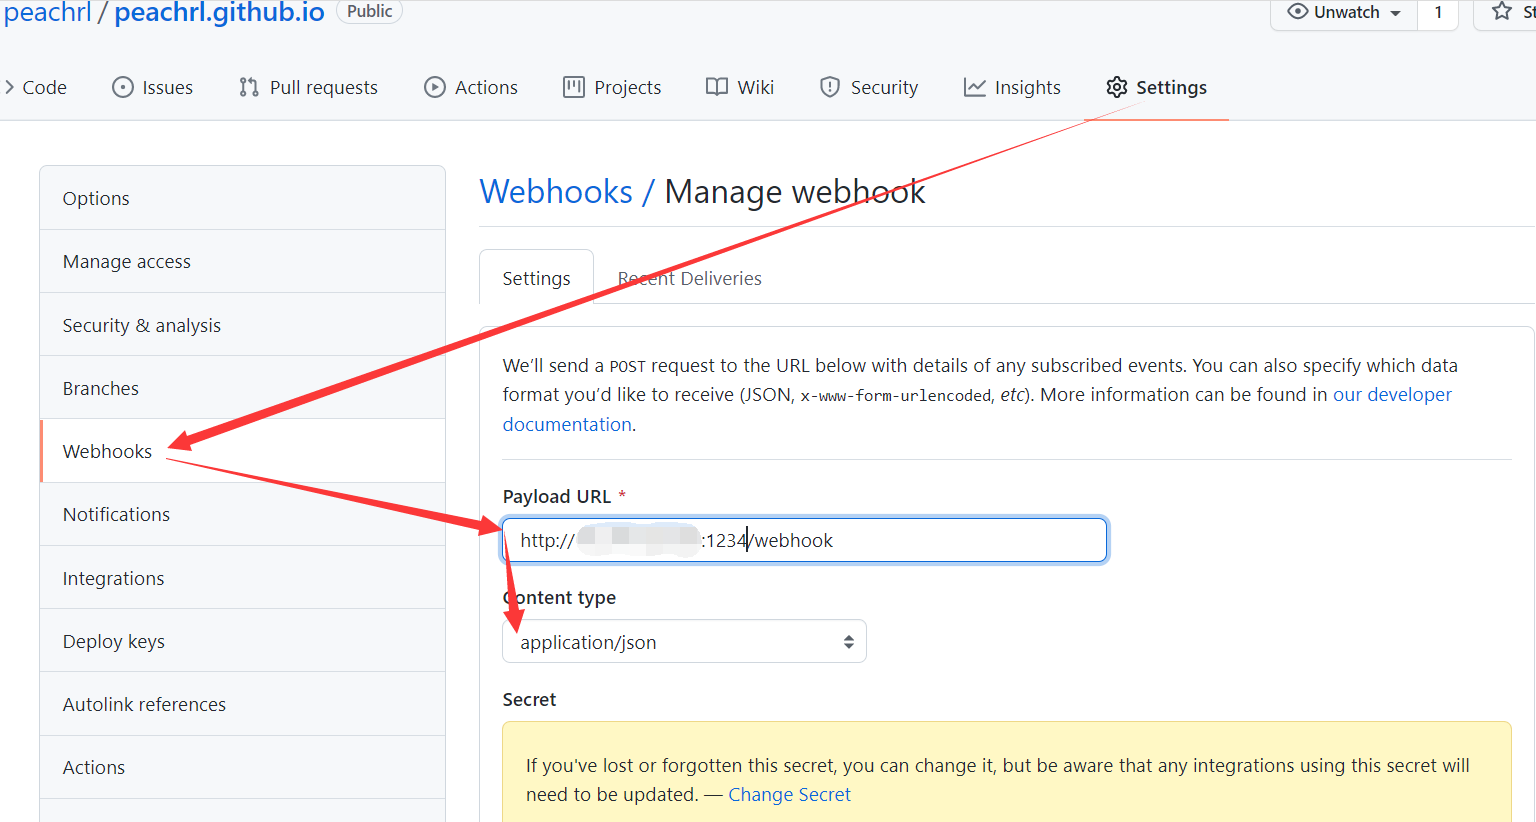
其中 Payload URL 写 http://test.com:1234/webhook ,"test.com"最好写自己服务器的公网IP。
Secret是在webhook.js里 var handler = createHandler({ path: '/webhook', secret: '(设个密码)' }) 所设的密码。

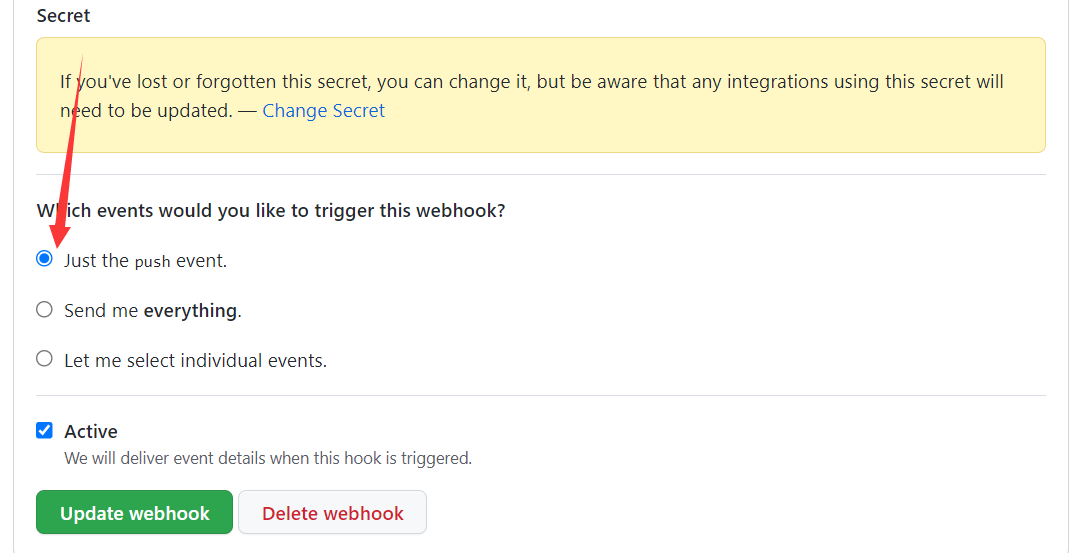
其他选项看图,看着办就行。
最后启动(重启)nginx:
sudo nginx # 或者 sudo systemctl start nginx 启动
sudo nginx -t #查看是否配置成功
sudo nginx -s reload #重启nginx
本文部分内容来自:
[1] https://www.jianshu.com/p/fd25a9c008a0
[2] https://jimmysong.io/blog/github-webhook-website-auto-deploy/

